Learn the powerful enterprise adaptable database:

Getting Started With ADABAS & Natural

Showing posts with label how-to. Show all posts

Thursday, November 3, 2022

How To Setup the Adabas and Natural Community Edition (Docker Version)

 .


Adabas is a non-relational database package that was developed by Software AG initially to run on IBM mainframes in 1971 (Wikipedia 2005). Recently Software AG claimed that Adabas and, its associated programming language, Natural, can run virtually anywhere including the cloud (Software AG 2020). They even announced that Adabas will reach far beyond the year 2050 (Software AG 2022). This series of blogs is a personal exploration on the Adabas and Natural Community Editions aiming to experience and appreciate the softwares.

Adabas=Database

Natural=Programming Language

Adabas and Natural Community Editions are available as Docker images (read here for those who are new to Docker). The community edition consists of three software bundles which must be installed altogether. The steps are as follows. Read the instructions on the respective web sites in order to set them up successfully.

(1) Pull and Run Adabas CE (refer https://hub.docker.com/r/softwareag/adabas-ce version 7.0.1),

(2) Pull and Run Natural CE (refer https://hub.docker.com/r/softwareag/natural-ce version 9.1.4),

and

(3) Download, Unzip and Run Natural ONE IDE (refer https://softwareag-usa.s3.amazonaws.com/Adanat_Docker/ONE.9.1.4.CE.zip version 9.1.4). Be cautioned that the default Windows unzip application may not be able to extract the contents correctly due to long file path name errors and therefore alternative unzip applications such as 7Zip is recommended.

The overview of the software roles are as follows.
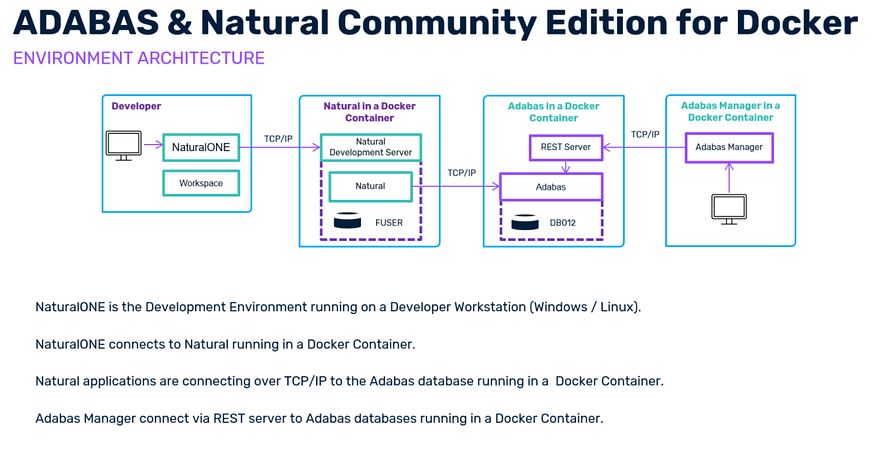
Overview of the roles of the softwares (Software AG)

The Adabas Community Edition for Docker image contains Adabas with all its Adabas utilities. For communication between Adabas server and other Adabas client Docker containers, Adabas provides a Adabas TCP/IP based communication link ADATCP. The Natural Community Edition Docker image contains the corresponding Adabas Client components and configuration option to use the Adabas TCP/IP link. (https://hub.docker.com/r/softwareag/adabas-ce)

Upon the successful setup of Adabas-CE version 7.0.1, the users would be able to view the Adabas REST web application login page via the URL http://localhost:8190 . The default login credential is provided on the page itself.
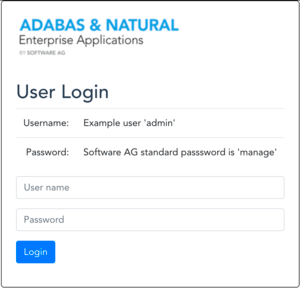
Adabas REST web application login page (Software AG)

The first page that users are recommended to visit is the databases page (i.e. http://localhost:8190/#/databases). This page provides the list of databases that the Adabas REST web application is connected to. Users can create new databases by clicking the button Create Adabas database (but, perhaps due to limited functionality of this Community Edition package, new databases could not be started. Read more about this by clicking the Nucleus Log button). The Name Field contains the name of the database i.e. GENERAL_DATABASE. The Show Details Field contains grouped information by the labels ParametersContainersNucleus LogFilesStatistics and Queues.

Adabas Database list page

Click on the name i.e. GENERAL_DATABASE to view the database information. The displayed information is as follows.
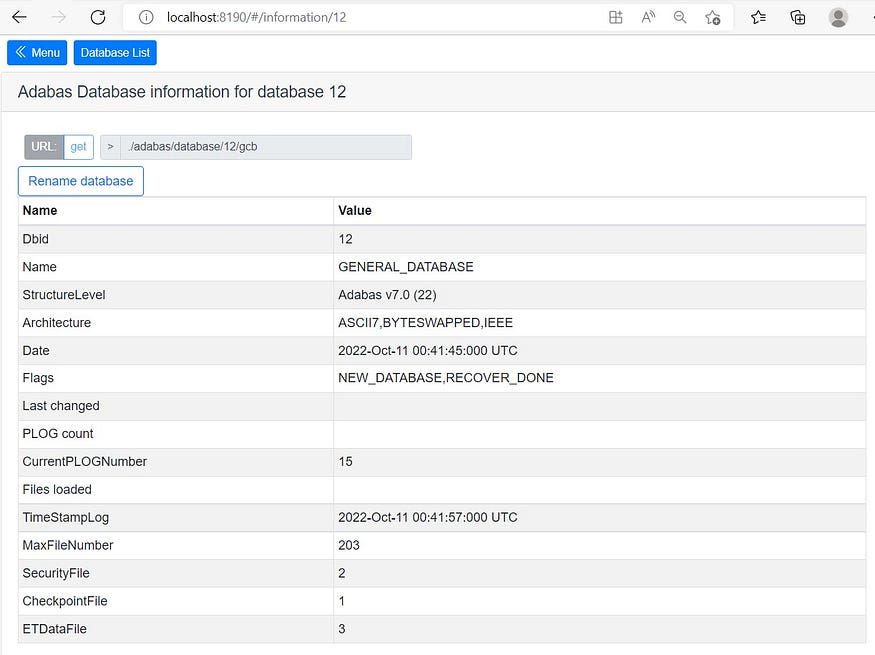
Adabas Database Information for database no. 12

The last three rows contains the information for (1) Security File, (2) Checkpoint File and (3) ETData File.

(1) The Adabas Security File contains the Adabas security definitions. For more information on Adabas security, refer to the documentation of the ADASCR utility, which is used to maintain the Adabas security definitions.

(2) The Adabas Checkpoint File is used to log some important events, the Adabas checkpoints; these checkpoints are written for: (a) Adabas utility execution, (b) Nucleus starts and stops, (c) Adabas user sessions with exclusive access to Adabas files, (d) User-defined checkpoints. The checkpoints are especially important for the database recovery.

(3) The ETData File is used to store information about the last transaction for all User IDs (ETIDs) specified in the Additions1 field for an OP command. The idea of specifying ETIDs is to enable the implementation of restart processing for programs using Adabas, following a crash.

(https://documentation.softwareag.com/adabas/ada701luw/basics/dbdesign.htm)

Click on the Database List button to get back to the Databases page.

Click n the Database List to get back to the Databases page.

More about Adabas database file information can be found in the Show Details field under the label Containers and Files.

The Containers and Files buttons in the Show Details field provides access to more information on Adabas database files.

The Containers page is as follows.
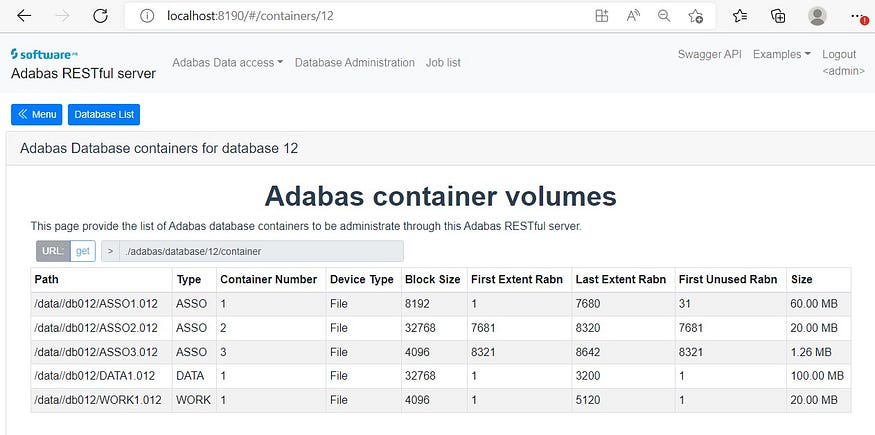
The Adabas container volumes page.

Container files are disk files created by Adabas utilities. They are managed by the Adabas nucleus and Adabas utilities. The internal structure of these files is organized and maintained by Adabas, thus permitting the use of very efficient disk usage algorithms. The required container files of an Adabas database are called ASSO, DATA and WORK. For some utilities, additional container files called SORT and TEMP are required. (https://documentation.softwareag.com/adabas/ada701luw/basics/contain.htm)

Click on the Database List button to get back to the Databases page and then from there, click the Files button to view the Adabas File list page as shown below.
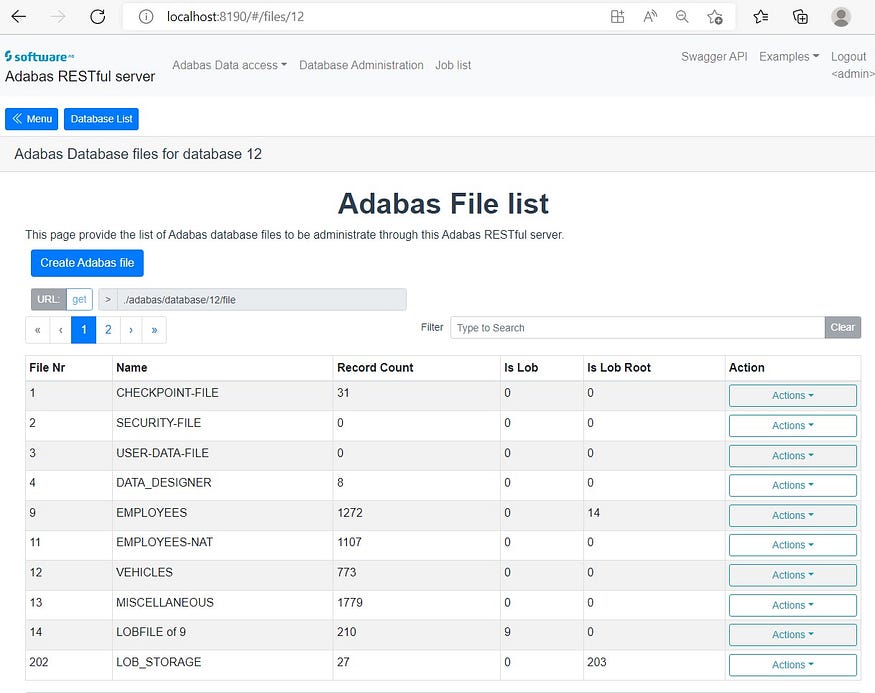
Adabas File list page.

Click the EMPLOYEES label in the Name field, and then click the Field definition tab located under the File list table as shown below.
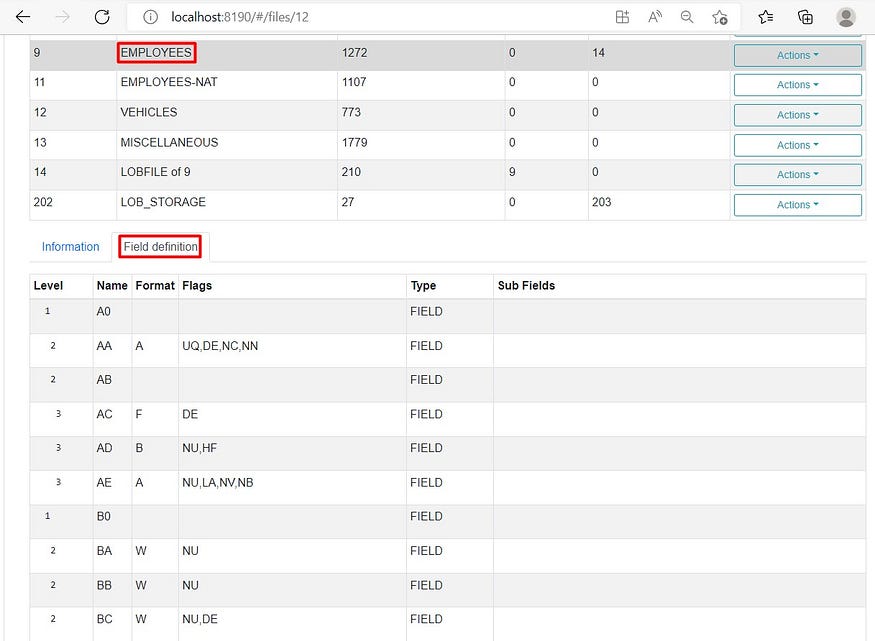
The above screenshot shows that the EMPLOYEE table is made up of two-lettered field names such as A0AAABAC and so on. This is Adabas style of field name conventions. Some of the fields have specified format such as AFB, and W.

The standard format of the field (expressed as a one-character code):

(A) Alphanumeric (left-justified),

(B) Binary (right-justified, unsigned),

(F) Fixed point (right-justified, signed),

(G) Floating (floating, double precision),

(P) Packed decimal (right-justified, signed),

(U) Unpacked decimal (right-justified, signed), and

(W) Unicode.

(https://documentation.softwareag.com/adabas/ada701luw/basics/fdtrec.htm)

Scroll further down to the bottom of the Field definition table. Observe that there are SUPER fields (H1, S2, S3) and SUB fields (S1) records. These fields group the other fields according to the information in the Sub Fields field.
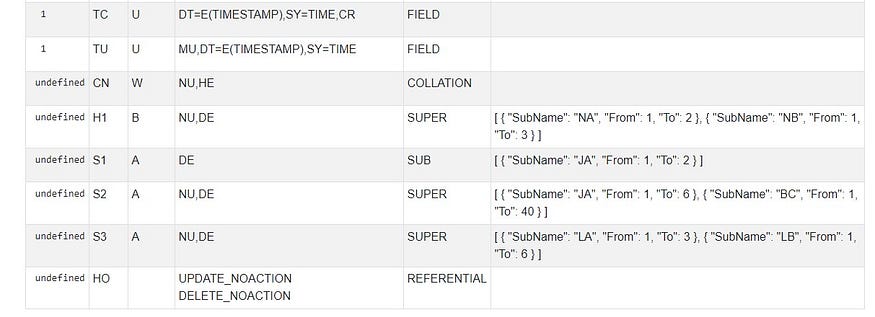
The Flags field contains further information for each fields as listed below.

(DE) Field is to be a descriptor (key).

(FI) Field is to have a fixed storage length; values are stored without an internal length byte, are not compressed, and cannot be longer than the defined field length.

(LA) An alphanumeric or wide-character, variable-length field may contain a value up to 16,381 bytes long.

(MU) Field may contain up to 191 values in a single record.

(NC) Field may contain a null value that satisfies the SQL interpretation of a field having no value; that is, the field’s value is not defined (not counted).

(NN) Field defined with NC option must always have a value defined; it cannot contain an SQL null (not null).

(NU) Null values occurring in the field are to be suppressed.

(NV) An alphanumeric or wide-character field is to be processed in the record buffer without being converted.

(PE) This group field is to define consecutive fields (which may include one or more MU fields) in the FDT that repeat together (up to 191 times) in a record.

(UQ) Field is to be a unique descriptor; that is, for each record in the file, the descriptor must have a different value.

(XI) For this field, the occurrence (index) number is to be excluded from the unique descriptor (UQ)

(https://documentation.softwareag.com/adabas/ada701luw/basics/fdtrec.htm)

Since Adabas classic field names are short (i.e. two-lettered names), it is often useful to define long field names for referencing and programming works, i.e. mapping.

The Adabas REST application mapping page provides more information on the table mapping. It provides a form-based interface for the user to select query parameters. There are four types of views/actions available:

(1) Adabas Map access (http://localhost:8190/#/map),
(2) Adabas classic access (http://localhost:8190/#/database),
(3) Adabas Map Metadata (http://localhost:8190/#/metadata), and
(4) Modify record (http://localhost:8190/#/modify).

A sample of REST requests and responses are provided at the bottom of the pages for reference. Users are recommended to try all these actions in order to understand the features of Adabas Databas mapping.

To be continued in the next part.

— — — —

This post is a part of the series “Getting Started With Adabas & Natural”:
Part 1: Setting up Adabas & Natural Community Edition Docker Version.
Part 2: Accessing Adabas Database via Adabas REST Web app.
Part 3: Adabas “Periodic Groups” and “Multiple Values” representation in JSON data format.
Part 4: Accessing Adabas Database using Adabas TCP-IP Node Package.
Part 5: Creating Natural Project using Natural ONE IDE.
Part 6: Accessing Adabas Database using Natural Programming and Natural ONE IDE.

— — — — —

.

Tuesday, June 7, 2022

How to Install Microsoft SQL Server 2019 and SQL Server Management Studio

 .

How to Install Microsoft SQL Server 2019 and SQL Server Management Studio

Do you want to install SQL Server 2019 on your Windows PC? How about the latest version of SQL Server Management Studio? I’ll walk you through the process. Soon you’ll be writing T-SQL queries and operating on SQL Server databases!

As I write this article, Microsoft SQL Server 2019 is the latest version of SQL Server. It’s the 15th version of one of the most popular database servers in the world. If you need to install the previous version, see our guide Microsoft SQL Server 2017 Installation Step by Step.

There are a few ways to install SQL Server 2019; the differences depend on if you have installed the older version. In this article, I will present everything based on SQL Server 2019’s Express edition, which is free for personal and commercial use.

Even if you’re just starting to learn SQL, it’s a good idea to install this popular DBMS. If you are wondering why MS SQL Server is a good choice, read the article Microsoft SQL Server Pros and Cons, which will help answer your question.

There are a lot of good online resources for learning MS SQL Server. In my opinion, however, it is worth choosing the most effective courses right at the start. Our SQL from A to Z in MS SQL Server track will give you all the necessary skills to work freely with T-SQL (the SQL dialect used by SQL Server). If you are a complete beginner and just want to see if SQL is for you, start with our SQL Basics in MS SQL Server course.

If you like learning SQL using hands-on exercises, then you’ve got to try LearnSQL.com.

How to Install Microsoft SQL Server 2019

To install SQL Server 2019, you must first download the program from Microsoft.

You’ll see something like the screenshot below. Look for the Express version.

Install Microsoft SQL Server 2019 and SQL Server Management Studio

Found it? Click Download now, wait a moment, and then run the installation file SQL2019-SSEI-Expr.exe. The installation wizard will appear:

Install Microsoft SQL Server 2019 and SQL Server Management Studio

Select Custom if you want to choose which components to install; a lot of people use this option. As you see below, you’ll need to specify the target location for the media download. If you want to change the default path, click the Browse button. Make sure you have enough disk space.

Install Microsoft SQL Server 2019 and SQL Server Management Studio

Click the Install button to download SQL Server 2019 Express’ installation packages:

Install Microsoft SQL Server 2019 and SQL Server Management Studio

Once the download is complete, you’ll get a message that everything was successful and that the installation is about to start.

Install Microsoft SQL Server 2019 and SQL Server Management Studio

Soon, you’ll see the Installation Center window. Choose New SQL Server stand-alone installation.

Install Microsoft SQL Server 2019 and SQL Server Management Studio

You must accept the license terms to use this producy, so check the button I accept the license and click the Next.

Install Microsoft SQL Server 2019 and SQL Server Management Studio

The installation process will start by identifying any problems and seeing if there are any existing files to update:

Install Microsoft SQL Server 2019 and SQL Server Management Studio Install Microsoft SQL Server 2019 and SQL Server Management Studio

If you only see warnings about the Windows firewall, you’re good to go. Click the Next button.

Install Microsoft SQL Server 2019 and SQL Server Management Studio

Now you can configure the server instance. I’ll leave it with the default settings.

Install Microsoft SQL Server 2019 and SQL Server Management Studio

Next, the setup wizard will install Java. It’s required for SQL Server to run:

Install Microsoft SQL Server 2019 and SQL Server Management Studio

When that’s done, the server configuration will appear. Click the Next button if everything looks good:

Install Microsoft SQL Server 2019 and SQL Server Management Studio

In Database Engine Configuration, you can change the authentication mode to Mixed. This will allow you to log into the server using either Windows authentication or a SQL Server sa (standard account) and a password which you choose:

Install Microsoft SQL Server 2019 and SQL Server Management Studio

Accept, download, and install R and Python. They can be useful in MS SQL Server:

Install Microsoft SQL Server 2019 and SQL Server Management Studio Install Microsoft SQL Server 2019 and SQL Server Management Studio

The installation will start.

Install Microsoft SQL Server 2019 and SQL Server Management Studio

When the installation process is complete, click Close.

Install Microsoft SQL Server 2019 and SQL Server Management Studio

Congratulations! You’ve just installed SQL Server 2019 on your computer. You can start writing your first queries using the IDE of your choice, an appropriate text editor, or the command line. If you want to use PostgreSQL too, no problem. Learn how to install PostgreSQL on Windows 10 in 5 minutes.

How to Install Microsoft SQL Server Management Studio

To work even more effectively with MS SQL Server, I recommend that you use Microsoft SQL Server Management Studio (SSMS) or a similar tool. SSMS is used by many professionals around the world, and it’s available for free.

I already showed you how to install the database; now I will guide you through installing this great editor.

To do this, you must go back to the SQL Server Installation Center. This is where you chose the new stand-alone database installation.

Install Microsoft SQL Server 2019 and SQL Server Management Studio

Now  choose  Install SQL Server Management Tools. You will be taken to Microsoft's website, where you’ll find and download the latest version of Management Studio.

Install Microsoft SQL Server 2019 and SQL Server Management Studio

Run the downloaded SSMS-Setup-ENU.exe file and the installation process will begin. Click the Install button to start. (You can change the installation path by choosing another folder.)

Install Microsoft SQL Server 2019 and SQL Server Management Studio

The packages will be loaded.

Install Microsoft SQL Server 2019 and SQL Server Management Studio

In the last step, you will be asked to restart your computer.

Install Microsoft SQL Server 2019 and SQL Server Management Studio

Go ahead and restart your PC. In the Start menu (assuming you’re using Windows OS), you’ll see Microsoft SQL Server 2019, which contains Microsoft SQL Server Management Studio. Click on it to start using this application.

Install Microsoft SQL Server 2019 and SQL Server Management Studio

Now you will have to connect to SQL Server. Choose SQL Server Authentication from the  Authentication drop-down menu and make sure the server type and name options are correct:

Install Microsoft SQL Server 2019 and SQL Server Management Studio

Write sa in the Login field and the server password that you used when installing the database. You can check Remember password if you don’t want to keep repeating this step each time you log in. Click Connect.

Install Microsoft SQL Server 2019 and SQL Server Management Studio

The editor is ready to manage the server and databases:

Install Microsoft SQL Server 2019 and SQL Server Management Studio

Now you are ready to write your first SQL scripts. This software is available for seven different database servers, including SQL Server and Oracle.

Have fun with MS SQL Server 2019 and MS Management Studio!

Other Popular Tools That Connect to SQL Server 2019

There are other tools which allow you to manage SQL Server 2019. They are all great alternatives to SSMS. The choice of a particular tool depends on your preferences. I recommend that you test a few of them and see which works best for you:

  • SQLGate – A powerful database IDE, SQLGate is available in different languages and for different database systems like SQL Server, Oracle, PostgreSQL, etc. You can purchase a license, pay for a subscription, or use a free version.
  • HeidiSQL – This is another tool for managing popular databases like SQL Server, PostgreSQL, MySQL, SQLite, etc. It is free and easy to learn.
  • RazorSQL – This is a simple SQL query editor and database browser with administration tools available for different OSs. It is paid and licensed per user.
  • Squirrel SQL – A free, Java-based GUI application, this SQL tool works on different OSs and for various popular database servers. Plus, it has a lot of cool plugins.

There are more tools that can help you to work with MS SQL Server database. Find one you like and start your database adventure.

How to Upgrade to SQL Server 2019 From an Earlier Version

Installing an entire new version of SQL Server is not necessary if you have an older version of SQL Server on your computer. For example, if you have installed SQL Server 2017 and want to update it to 2019, you can do that. First, launch SQL Server Installation Center:

Install Microsoft SQL Server 2019 and SQL Server Management Studio

Next, click Upgrade from a previous version of SQL Server. In the Browse For Folder window, select your SQL Server media folder (the actual name may vary) and click OK.

Install Microsoft SQL Server 2019 and SQL Server Management Studio

The upgrade process will start. It’s very similar to the installation process we used earlier. Just follow the steps and you’ll have the new version of SQL Server installed.

Install Microsoft SQL Server 2019 and SQL Server Management Studio

.