.
Setting up the Adabas and Natural Community Edition packages
Adabas is a non-relational database package that was developed by Software AG initially to run on IBM mainframes in 1971 (Wikipedia 2005). Recently Software AG claimed that Adabas and, its associated programming language, Natural, can run virtually anywhere including the cloud (Software AG 2020). They even announced that Adabas will reach far beyond the year 2050 (Software AG 2022). This series of blogs is a personal exploration on the Adabas and Natural Community Editions aiming to experience and appreciate the softwares.
Adabas=Database
Natural=Programming Language
Adabas and Natural Community Editions are available as Docker images (read here for those who are new to Docker). The community edition consists of three software bundles which must be installed altogether. The steps are as follows. Read the instructions on the respective web sites in order to set them up successfully.
(1) Pull and Run Adabas CE (refer https://hub.docker.com/r/softwareag/adabas-ce version 7.0.1),
(2) Pull and Run Natural CE (refer https://hub.docker.com/r/softwareag/natural-ce version 9.1.4),
and
(3) Download, Unzip and Run Natural ONE IDE (refer https://softwareag-usa.s3.amazonaws.com/Adanat_Docker/ONE.9.1.4.CE.zip version 9.1.4). Be cautioned that the default Windows unzip application may not be able to extract the contents correctly due to long file path name errors and therefore alternative unzip applications such as 7Zip is recommended.
The overview of the software roles are as follows.
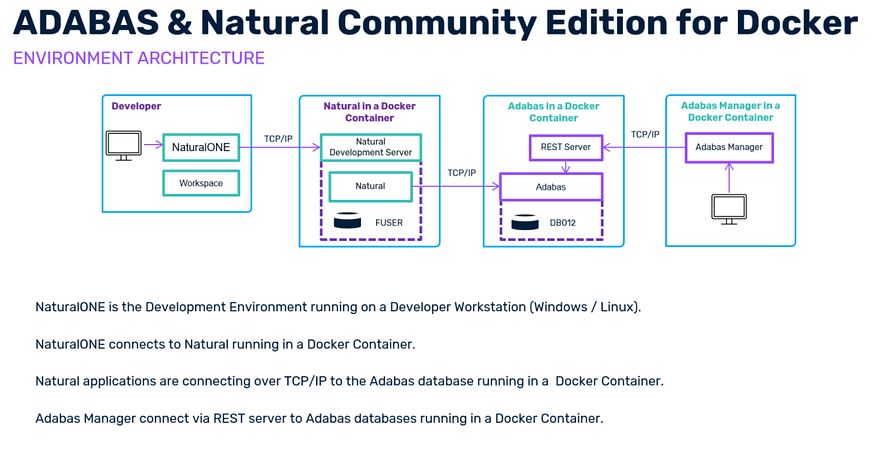
The Adabas Community Edition for Docker image contains Adabas with all its Adabas utilities. For communication between Adabas server and other Adabas client Docker containers, Adabas provides a Adabas TCP/IP based communication link ADATCP. The Natural Community Edition Docker image contains the corresponding Adabas Client components and configuration option to use the Adabas TCP/IP link. (https://hub.docker.com/r/softwareag/adabas-ce)
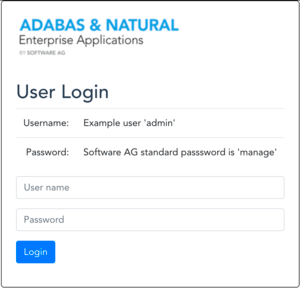
Upon the successful setup of Adabas-CE version 7.0.1, the users would be able to view the Adabas REST web application login page via the URL http://localhost:8190 . The default login credential is provided on the page itself.
The first page that users are recommended to visit is the databases page (i.e. http://localhost:8190/#/databases). This page provides the list of databases that the Adabas REST web application is connected to. Users can create new databases by clicking the button Create Adabas database (but, perhaps due to limited functionality of this Community Edition package, new databases could not be started. Read more about this by clicking the Nucleus Log button). The Name Field contains the name of the database i.e. GENERAL_DATABASE. The Show Details Field contains grouped information by the labels Parameters, Containers, Nucleus Log, Files, Statistics and Queues.

Click on the name i.e. GENERAL_DATABASE to view the database information. The displayed information is as follows.
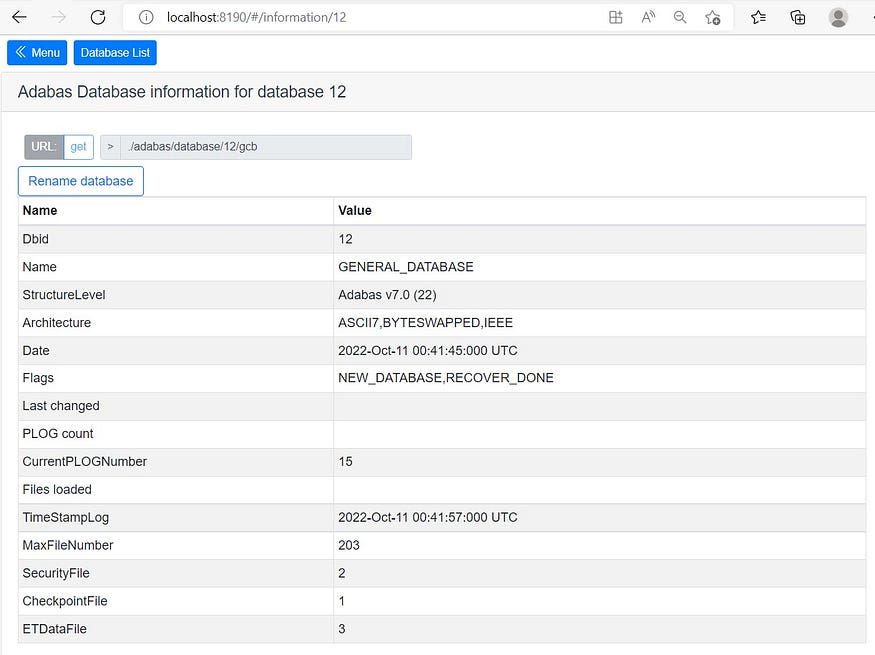
The last three rows contains the information for (1) Security File, (2) Checkpoint File and (3) ETData File.
(1) The Adabas Security File contains the Adabas security definitions. For more information on Adabas security, refer to the documentation of the ADASCR utility, which is used to maintain the Adabas security definitions.
(2) The Adabas Checkpoint File is used to log some important events, the Adabas checkpoints; these checkpoints are written for: (a) Adabas utility execution, (b) Nucleus starts and stops, (c) Adabas user sessions with exclusive access to Adabas files, (d) User-defined checkpoints. The checkpoints are especially important for the database recovery.
(3) The ETData File is used to store information about the last transaction for all User IDs (ETIDs) specified in the Additions1 field for an OP command. The idea of specifying ETIDs is to enable the implementation of restart processing for programs using Adabas, following a crash.
(https://documentation.softwareag.com/adabas/ada701luw/basics/dbdesign.htm)
Click on the Database List button to get back to the Databases page.

More about Adabas database file information can be found in the Show Details field under the label Containers and Files.

The Containers page is as follows.
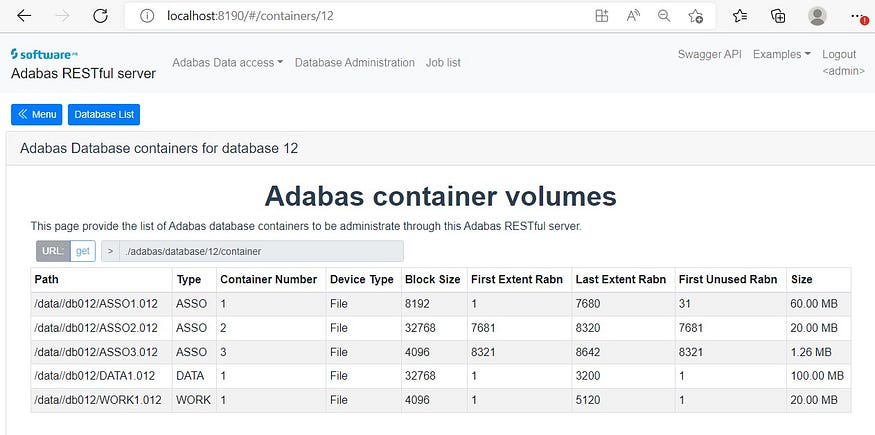
Container files are disk files created by Adabas utilities. They are managed by the Adabas nucleus and Adabas utilities. The internal structure of these files is organized and maintained by Adabas, thus permitting the use of very efficient disk usage algorithms. The required container files of an Adabas database are called ASSO, DATA and WORK. For some utilities, additional container files called SORT and TEMP are required. (https://documentation.softwareag.com/adabas/ada701luw/basics/contain.htm)
Click on the Database List button to get back to the Databases page and then from there, click the Files button to view the Adabas File list page as shown below.
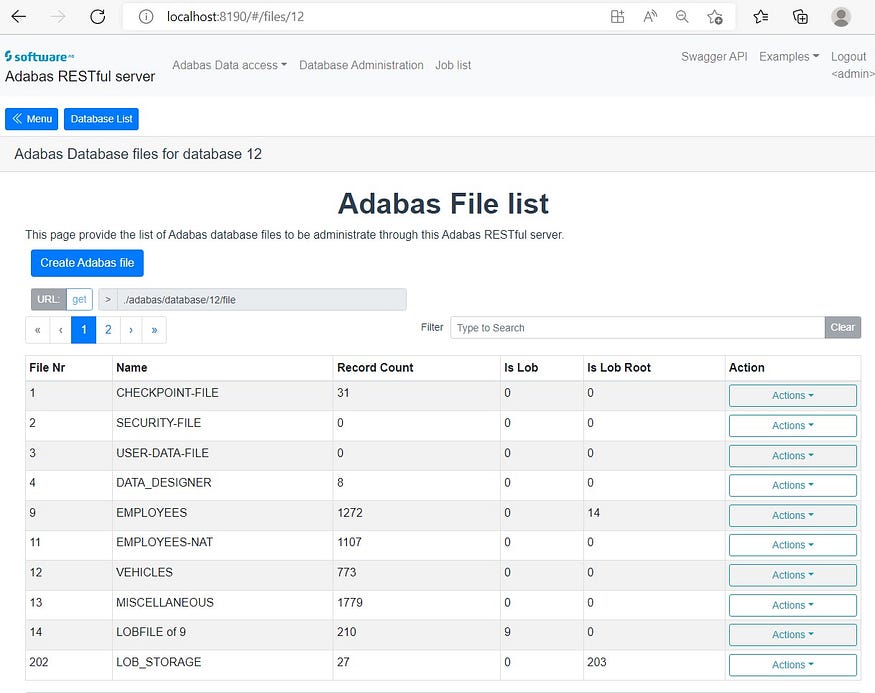
Click the EMPLOYEES label in the Name field, and then click the Field definition tab located under the File list table as shown below.
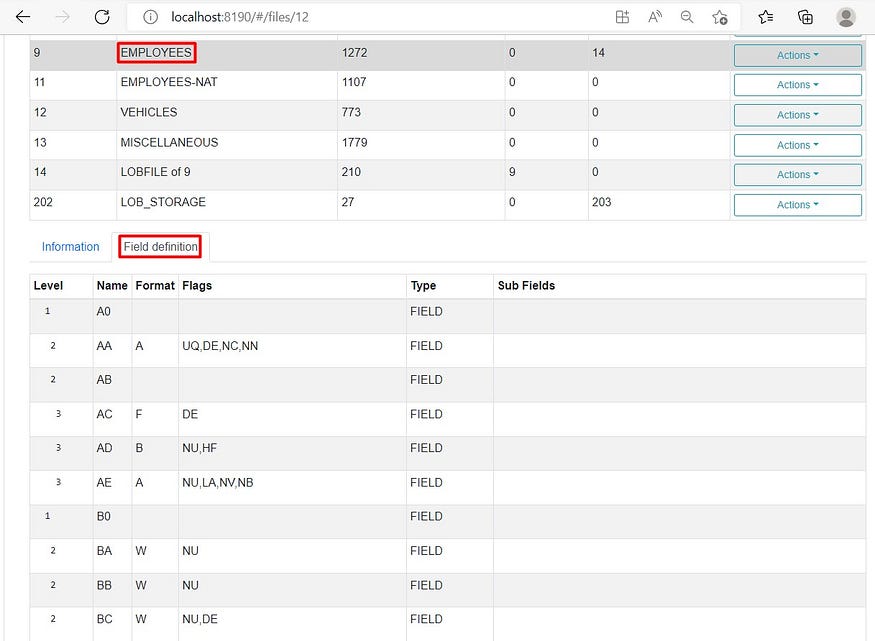
The above screenshot shows that the EMPLOYEE table is made up of two-lettered field names such as A0, AA, AB, AC and so on. This is Adabas style of field name conventions. Some of the fields have specified format such as A, F, B, and W.
The standard format of the field (expressed as a one-character code):
(A) Alphanumeric (left-justified),
(B) Binary (right-justified, unsigned),
(F) Fixed point (right-justified, signed),
(G) Floating (floating, double precision),
(P) Packed decimal (right-justified, signed),
(U) Unpacked decimal (right-justified, signed), and
(W) Unicode.
(https://documentation.softwareag.com/adabas/ada701luw/basics/fdtrec.htm)
Scroll further down to the bottom of the Field definition table. Observe that there are SUPER fields (H1, S2, S3) and SUB fields (S1) records. These fields group the other fields according to the information in the Sub Fields field.
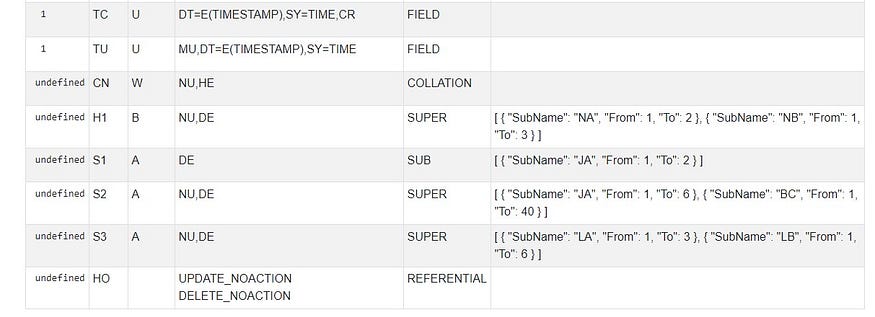
The Flags field contains further information for each fields as listed below.
(DE) Field is to be a descriptor (key).
(FI) Field is to have a fixed storage length; values are stored without an internal length byte, are not compressed, and cannot be longer than the defined field length.
(LA) An alphanumeric or wide-character, variable-length field may contain a value up to 16,381 bytes long.
(MU) Field may contain up to 191 values in a single record.
(NC) Field may contain a null value that satisfies the SQL interpretation of a field having no value; that is, the field’s value is not defined (not counted).
(NN) Field defined with NC option must always have a value defined; it cannot contain an SQL null (not null).
(NU) Null values occurring in the field are to be suppressed.
(NV) An alphanumeric or wide-character field is to be processed in the record buffer without being converted.
(PE) This group field is to define consecutive fields (which may include one or more MU fields) in the FDT that repeat together (up to 191 times) in a record.
(UQ) Field is to be a unique descriptor; that is, for each record in the file, the descriptor must have a different value.
(XI) For this field, the occurrence (index) number is to be excluded from the unique descriptor (UQ)
(https://documentation.softwareag.com/adabas/ada701luw/basics/fdtrec.htm)
Since Adabas classic field names are short (i.e. two-lettered names), it is often useful to define long field names for referencing and programming works, i.e. mapping.
The Adabas REST application mapping page provides more information on the table mapping. It provides a form-based interface for the user to select query parameters. There are four types of views/actions available:
(1) Adabas Map access (http://localhost:8190/#/map),
(2) Adabas classic access (http://localhost:8190/#/database),
(3) Adabas Map Metadata (http://localhost:8190/#/metadata), and
(4) Modify record (http://localhost:8190/#/modify).

A sample of REST requests and responses are provided at the bottom of the pages for reference. Users are recommended to try all these actions in order to understand the features of Adabas Databas mapping.
To be continued in the next part.
— — — —
This post is a part of the series “Getting Started With Adabas & Natural”:
Part 1: Setting up Adabas & Natural Community Edition Docker Version.
Part 2: Accessing Adabas Database via Adabas REST Web app.
Part 3: Adabas “Periodic Groups” and “Multiple Values” representation in JSON data format.
Part 4: Accessing Adabas Database using Adabas TCP-IP Node Package.
Part 5: Creating Natural Project using Natural ONE IDE.
Part 6: Accessing Adabas Database using Natural Programming and Natural ONE IDE.
— — — — —
.

No comments:
Post a Comment