.
Download SQL Server Data Tools (SSDT) for Visual Studio
Applies to:  SQL Server (all supported versions)
  Azure SQL Database
  Azure Synapse Analytics
SQL Server Data Tools (SSDT) is a modern development tool for building SQL Server relational databases, databases in Azure SQL, Analysis Services (AS) data models, Integration Services (IS) packages, and Reporting Services (RS) reports. With SSDT, you can design and deploy any SQL Server content type with the same ease as you would develop an application in Visual Studio.
SSDT for Visual Studio 2022
Changes in SSDT for Visual Studio 2022
The core SSDT functionality to create database projects has remained integral to Visual Studio.
Note
There's no SSDT standalone installer for Visual Studio 2022.
Install SSDT with Visual Studio 2022
If Visual Studio 2022 is already installed, you can edit the list of workloads to include SSDT. If you don’t have Visual Studio 2022 installed, then you can download and install Visual Studio 2022.
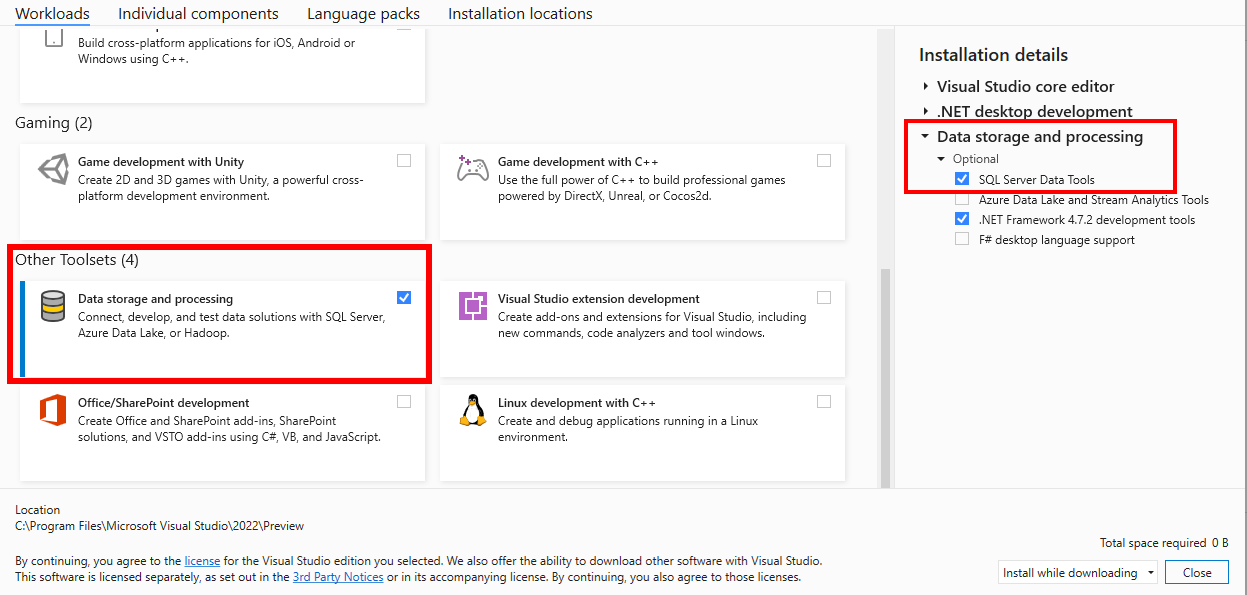
To modify the installed Visual Studio workloads to include SSDT, use the Visual Studio Installer.
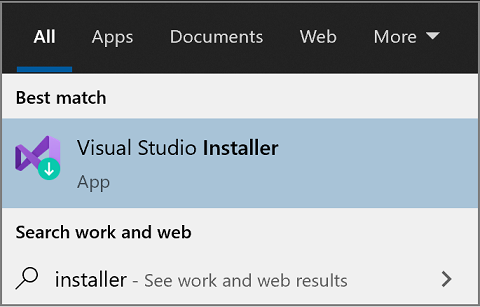
- Launch the Visual Studio Installer. In the Windows Start menu, you can search for "installer".

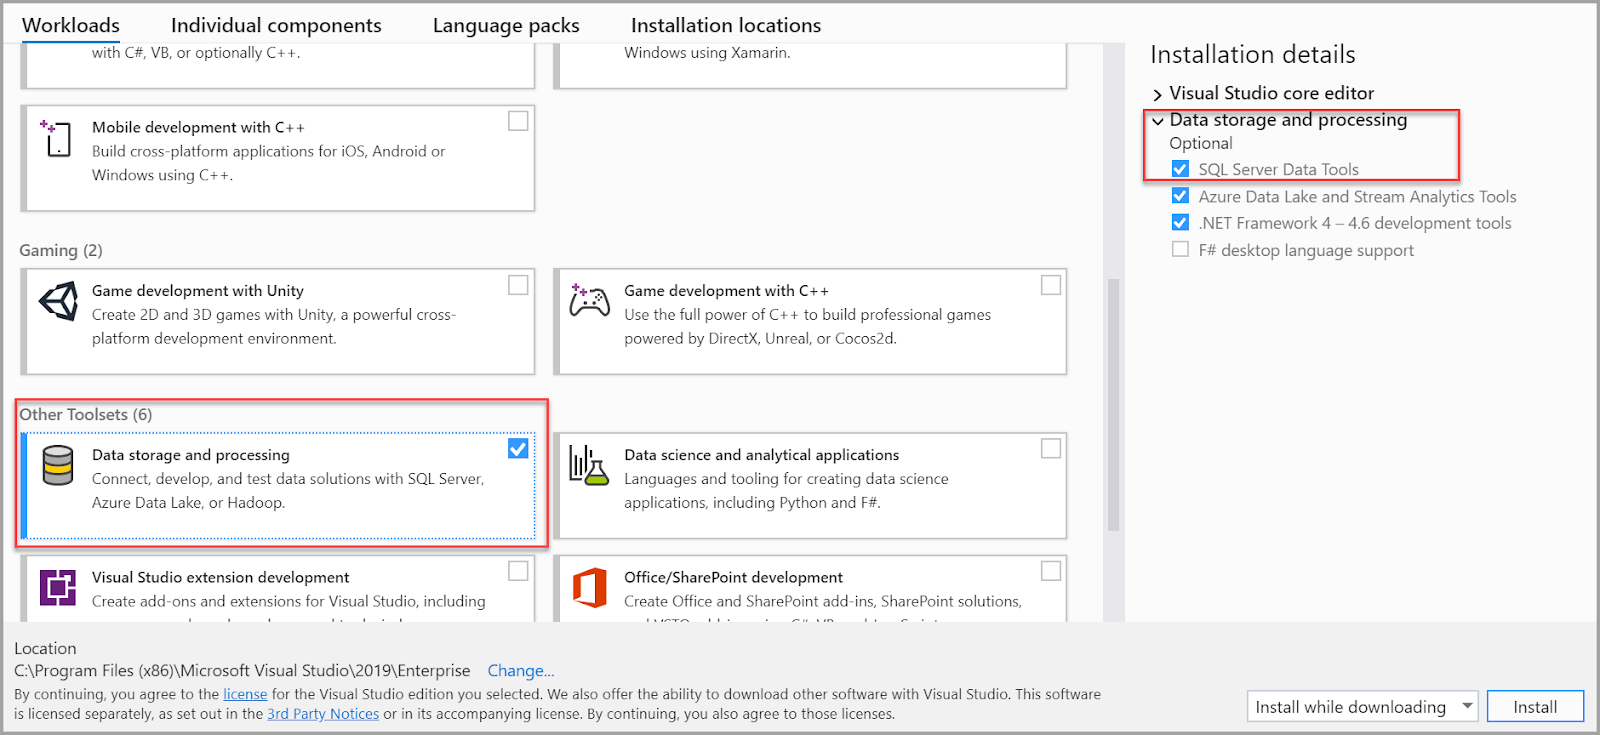
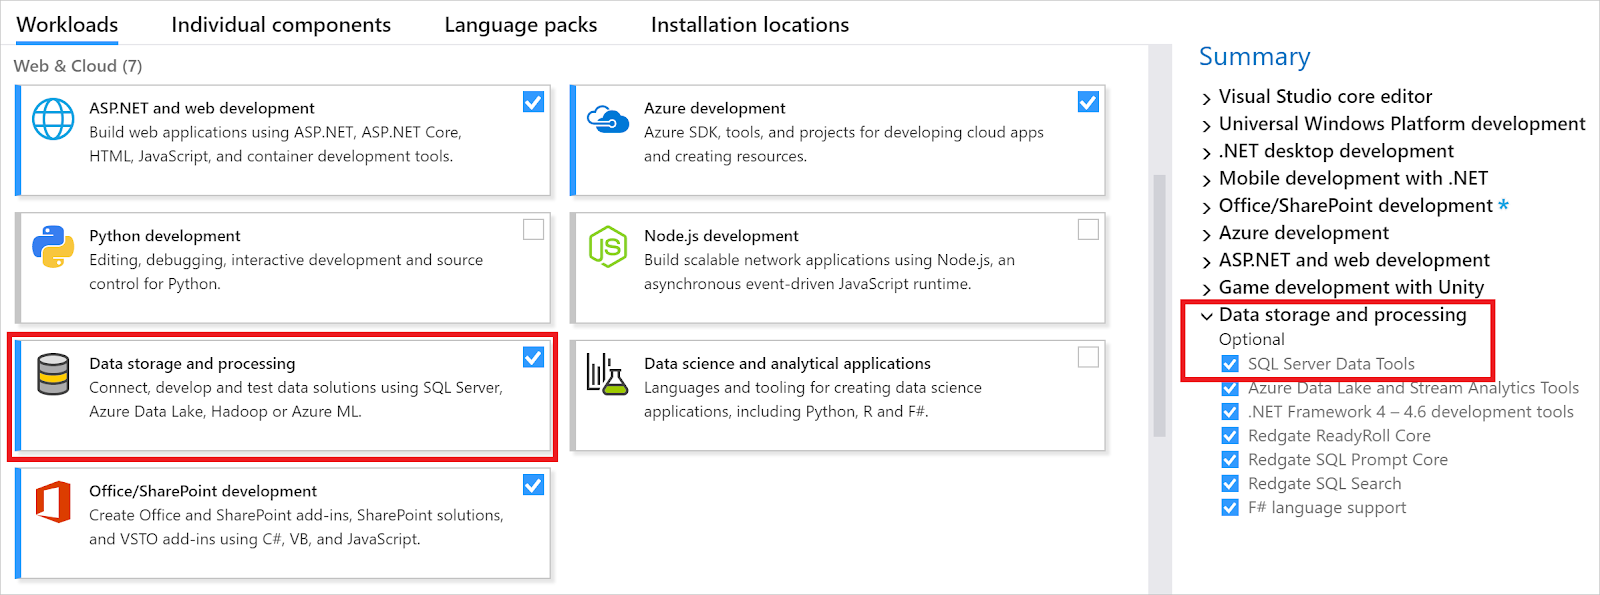
- In the installer, select for the edition of Visual Studio that you want to add SSDT to, and then choose Modify.
- Select SQL Server Data Tools under Data storage and processing in the list of workloads.
For Analysis Services or Reporting Services projects, you can install the appropriate extensions from within Visual Studio with Extensions > Manage Extensions or from the Marketplace.
The extension for Integration Services projects is not available for Visual Studio 2022 at this time.
Supported SQL versions
Project Templates | SQL Platforms Supported |
Relational databases | SQL Server 2016 - SQL Server 2022
Azure SQL Database, Managed Instance
Azure Synapse Analytics (dedicated pools only) |
Analysis Services models
Reporting Services reports | SQL Server 2016 - SQL Server 2019 |
SSDT for Visual Studio 2019
Changes in SSDT for Visual Studio 2019
The core SSDT functionality to create database projects has remained integral to Visual Studio.
With Visual Studio 2019, the required functionality to enable Analysis Services, Integration Services, and Reporting Services projects has moved into the respective Visual Studio (VSIX) extensions only.
Note
There's no SSDT standalone installer for Visual Studio 2019.
Install SSDT with Visual Studio 2019
If Visual Studio 2019 is already installed, you can edit the list of workloads to include SSDT. If you don’t have Visual Studio 2019 installed, then you can download and install Visual Studio 2019 Community.
To modify the installed Visual Studio workloads to include SSDT, use the Visual Studio Installer.
- Launch the Visual Studio Installer. In the Windows Start menu, you can search for "installer".
- In the installer, select for the edition of Visual Studio that you want to add SSDT to, and then choose Modify.
- Select SQL Server Data Tools under Data storage and processing in the list of workloads.
For Analysis Services, Integration Services, or Reporting Services projects, you can install the appropriate extensions from within Visual Studio with Extensions > Manage Extensions or from the Marketplace.
Supported SQL versions
Project Templates | SQL Platforms Supported |
Relational databases | SQL Server 2012 - SQL Server 2019
Azure SQL Database, Managed Instance
Azure Synapse Analytics (dedicated pools only) |
Analysis Services models
Reporting Services reports | SQL Server 2008 - SQL Server 2019 |
Integration Services packages | SQL Server 2012 - SQL Server 2019 |
Previous versions
To download and install SSDT for Visual Studio 2017, or an older version of SSDT, see Previous releases of SQL Server Data Tools (SSDT and SSDT-BI).
See Also
Next steps
After installing SSDT, work through these tutorials to learn how to create databases, packages, data models, and reports using SSDT.
Previous releases of SQL Server Data Tools (SSDT and SSDT-BI)
Applies to:  SQL Server (all supported versions)
  Azure SQL Database
  Azure SQL Managed Instance
  Azure Synapse Analytics
  Analytics Platform System (PDW)
SQL Server Data Tools (SSDT) provides project templates and design surfaces for building SQL Server content types - relational databases, Analysis Services models, Reporting Services reports, and Integration Services packages.
SSDT is backwards compatible, so you can always use the newest SSDT to design and deploy databases, models, reports, and packages that run on older versions of SQL Server.
Historically, the Visual Studio shell used to create SQL Server content types has been released under various names, including SQL Server Data Tools, SQL Server Data Tools - Business Intelligence, and Business Intelligence Development Studio. Previous versions came with distinct sets of project templates. To get all of the project templates together in one SSDT, you need the newest version. Otherwise, you probably need to install multiple previous versions to get all of the templates used in SQL Server. Only one shell is installed per version of Visual Studio; installing a second SSDT just adds the missing templates.
SSDT for Visual Studio 2017
Changes in SSDT for Visual Studio 2017
Starting with Visual Studio 2017, the functionality of creating Database Projects has been integrated into the Visual Studio installation. There's no need to install the SSDT standalone installer for the core SSDT experience.
Now to create Analysis Services, Integration Services, or Reporting Services projects, you still need the SSDT standalone installer.
Install SSDT with Visual Studio 2017
To install SSDT during Visual Studio installation, select the Data storage and processing workload, and then select SQL Server Data Tools.
If Visual Studio is already installed, use the Visual Studio Installer to modify the installed workloads to include SSDT.
- Launch the Visual Studio Installer. In the Windows Start menu, you can search for "installer".

- In the installer, select for the edition of Visual Studio that you want to add SSDT to, and then choose Modify.
- Select SQL Server Data Tools under Data storage and processing in the list of workloads.
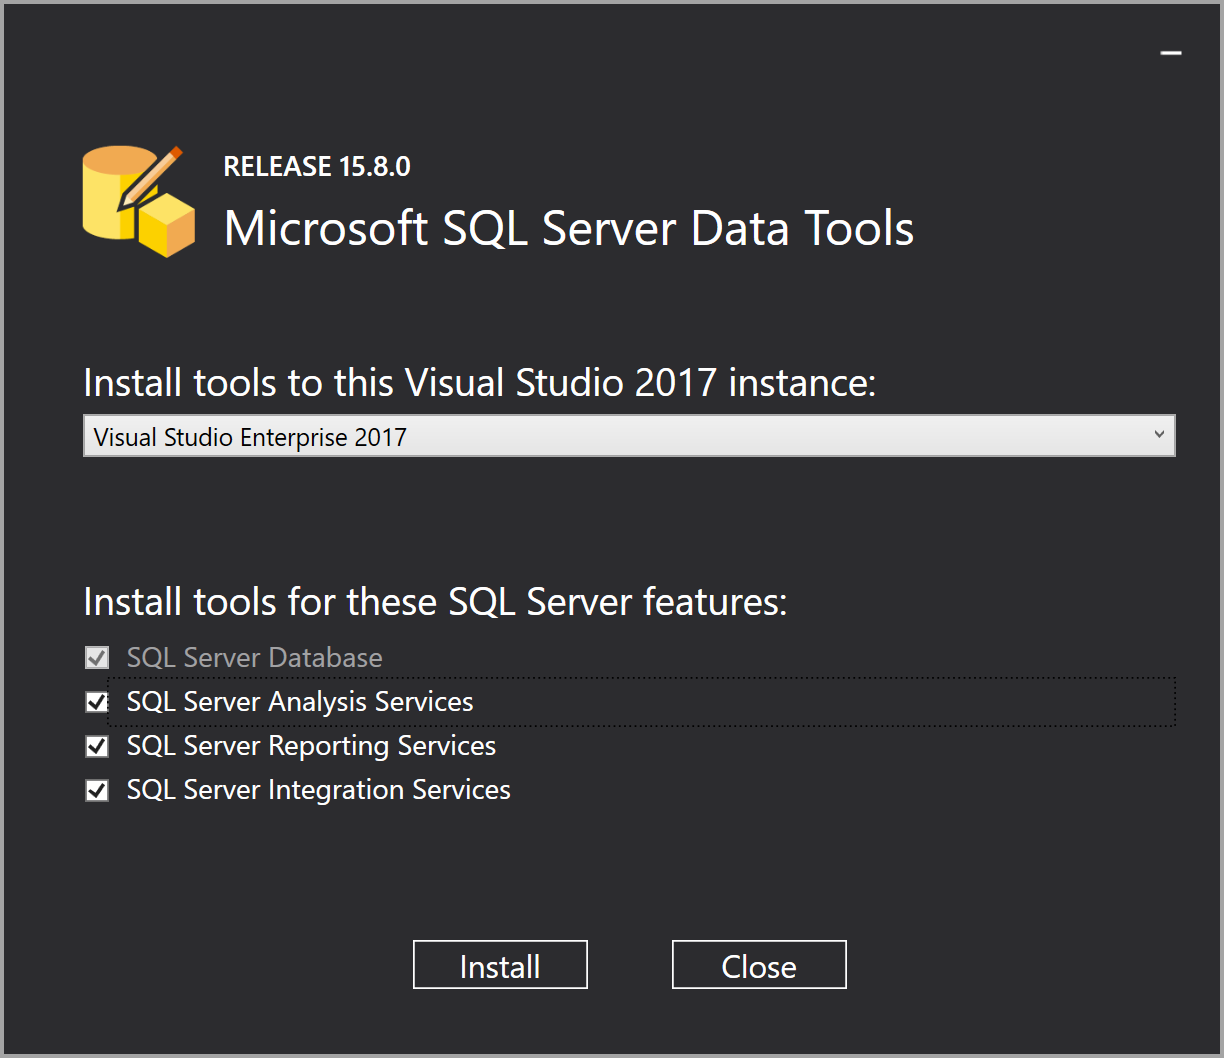
Install Analysis Services, Integration Services, and Reporting Services tools
To install Analysis Services, Integration Services, and Reporting Services project support, run the SSDT standalone installer.
The installer lists available Visual Studio instances to add SSDT tools. If Visual Studio isn't already installed, selecting Install a new SQL Server Data Tools instance installs SSDT with a minimal version of Visual Studio, but for the best experience, we recommend using SSDT with the latest version of Visual Studio.
Supported SQL versions
Project Templates | SQL Platforms Supported |
Relational databases | SQL Server 2005* - SQL Server 2017
Azure SQL Database
Azure Synapse Analytics (supports queries only; database projects aren't yet supported)
* SQL Server 2005 support is deprecated,
move to an officially supported SQL version |
Analysis Services models
Reporting Services reports | SQL Server 2008 - SQL Server 2017 |
Integration Services packages | SQL Server 2012 - SQL Server 2019 |
SSDT for VS 2017 (standalone installer)
 Download SSDT for Visual Studio 2017 (15.9.10)
Important
- Before installing SSDT for Visual Studio 2017 (15.9.10), uninstall Analysis Services Projects and Reporting Services Projects extensions if they are already installed, and close all VS instances.
- Removed the inbox component Power Query Source for SQL Server 2017. Now we have announced Power Query Source for SQL Server 2017 & 2019 as out-of-box component, which can be downloaded here.
- To design packages using Oracle and Teradata connectors and targeting an earlier version of SQL Server prior to SQL 2019, in addition to the Microsoft Oracle Connector for SQL 2019 and Microsoft Teradata Connector for SQL 2019, you need to also install the corresponding version of Microsoft Connector for Oracle and Teradata by Attunity.
Release Notes
For a complete list of changes, see Release notes for SQL Server Data Tools (SSDT).
System requirements
SSDT for Visual Studio 2017 has the same system requirements as Visual Studio.
Available Languages - SSDT for VS 2017
This release of SSDT for VS 2017 can be installed in the following languages:
Considerations and limitations
- You can’t install the community version offline
- To upgrade SSDT, you need to follow the same path used to install SSDT. For example, if you added SSDT using the VSIX extensions, then you must upgrade via the VSIX extensions. If you installed SSDT via a separate install, then you need to upgrade using that method.
Offline install
To install SSDT when you’re not connected to the internet, follow the steps in this section. For more information, see Create a network installation of Visual Studio 2017.
First, complete the following steps while online:
- Download the SSDT standalone installer.
- Download vs_sql.exe.
- While still online, execute one of the following commands to download all the files required for installing offline. Using the --layout option is the key, it downloads the actual files for the offline installation. Replace <filepath> with the actual layouts path to save the files.
a. For a specific language, pass the locale: --lang. A single language is ~1 GB in size. - dos
- Copy
vs_sql.exe --layout c:\<filepath> --lang en-us
- b. For all languages, omit the --lang argument. All languages are ~3.9 GB.
- dos
- Copy
vs_sql.exe --layout c:\<filepath>
After completing the previous steps, the following steps below can be done offline:
- Run this command to install the VS2017 Shell and SQL Server Data Project.
- dos
- Copy
vs_setup.exe --NoWeb
- Run this command to install SSDT
a. For an interactive installation, from the layouts folder, run this command and select SSIS/SSRS/SSAS - dos
- Copy
SSDT-Setup-ENU.exe /install
- b. For an unattended installation, run this command
- dos
- Copy
SSDT-Setup-ENU.exe /INSTALLALL[:vsinstances] /passive
- c. For an unattended installation to a specific VS Instance that you may have previously installed, you can query the instance ID of the desired VS instance
- dos
- Copy
cd C:\Program Files (x86)\Microsoft Visual Studio\Installer
C:\Program Files (x86)\Microsoft Visual Studio\Installer> vswhere.exe -all
- Then run this command by replacing the VS_INSTANCE_ID_HERE with your instanceID (it will look something like this: 49cf420b)
- dos
- Copy
SSDT-Setup-ENU.exe /INSTALLALL[:VS_INSTANCE_ID_HERE] /passive
For available options, run SSDT-Setup-ENU.exe /help
Note
If using a full version of Visual Studio 2017, create an offline folder for SSDT only, and run SSDT-Setup-ENU.exe from this newly created folder (don’t add SSDT to another Visual Studio 2017 offline layout). If you add the SSDT layout to an existing Visual Studio offline layout, the necessary runtime (.exe) components are not created there.
Previous SSDT releases
Download previous SSDT versions by selecting the download link in the related section.
SSDT for Visual Studio (VS) 2017
Download SSDT for Visual Studio 2017 (15.8)
This SSDT for Visual Studio 2017 release can be installed in the following languages:
Chinese (Simplified) | Chinese (Traditional) | English (United States) | French | German | Italian | Japanese | Korean | Portuguese (Brazil) | Russian | Spanish
SSDT for Visual Studio (VS) 2015
To install this version of SSDT, you must download an ISO image. The ISO file is a self-contained file that contains all of the components needed by SSDT and it can be downloaded using a restartable download manager, useful for situations with limited, or less reliable network bandwidth. Once downloaded, the ISO can be mounted as a drive.
Steps to install:
- Download SSDT for Visual Studio 2015 (17.4).
- Open the ISO image.
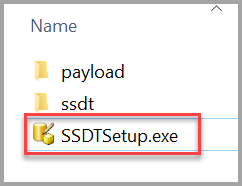
- Run the SSDTSetup.exe file.

This SSDT for Visual Studio 2015 release can be installed in the following languages:
Language | SHA256 Hash |
Chinese (Simplified) | 79A958B122DDEC2857F1F4B9F0272A6BD2106BB17B4DA94CC68CACFCDDC16EAE |
Chinese (Traditional) | 8F9661883F2D2D28D6928AE66242DB465DBB25696EDFE0348D222421CEAB000A |
English (United States) | 7727BA227A9E49C2DFCC1E9F2A10924CC472E3425653DC7DE8E4B830712B302E |
French | 2DF6655819F604E8D20A396CA9FDFEE279C5A9E50776FFC143A5BA4C3E2F1849 |
German | 5C44502DEE8B31675D0B10B4CE8CA6F5D96A2692CC498B9859A77C24F30EF870 |
Italian | 6A616F6E3A1C7DD52457FB8C8692E5C1C551032FF46AD8C5112CF9364F17C631 |
Japanese | 1244A5EADF673E4BD36E9967A2008F65CA2A1D40E8E7DD4D17640A6FC1EACA9A |
Korean | 6E0E057A853F54AB87F3F8984954F590FCCD3BE2EC2139F02EFA085FEA6D3E61 |
Portuguese (Brazil) | 24122C092464B299F41A7644814F375F0CC2786877BCAE0282221FF8D73BD100 |
Russian | 2CDE208C241C3F13D2EC37294C10503C7A9D1222ED33F6FE54849169F30BE697 |
Spanish | BD12844E6F0A0ECFD5815D01EDFB8018CE9B4A1044DE8DF96AC740D85E800FD6 |
SSDT for Visual Studio (VS) 2013
To install this version of SSDT, you must download an ISO image. The ISO file is a self-contained file that contains all of the components needed by SSDT and it can be downloaded using a restartable download manager, useful for situations with limited, or less reliable network bandwidth. Once downloaded, the ISO can be mounted as a drive.
Steps to install:
- Download SSDT for Visual Studio 2013 (16.5)
- Open the ISO image.
- Run the SSDTSetup.exe file.

This SSDT for Visual Studio 2013 release can be installed in the following languages:
Language | SHA256 Hash |
Chinese (Simplified) | 79A958B122DDEC2857F1F4B9F0272A6BD2106BB17B4DA94CC68CACFCDDC16EAE |
Chinese (Traditional) | 8F9661883F2D2D28D6928AE66242DB465DBB25696EDFE0348D222421CEAB000A |
English (United States) | 7727BA227A9E49C2DFCC1E9F2A10924CC472E3425653DC7DE8E4B830712B302E |
French | 2DF6655819F604E8D20A396CA9FDFEE279C5A9E50776FFC143A5BA4C3E2F1849 |
German | 5C44502DEE8B31675D0B10B4CE8CA6F5D96A2692CC498B9859A77C24F30EF870 |
Italian | 6A616F6E3A1C7DD52457FB8C8692E5C1C551032FF46AD8C5112CF9364F17C631 |
Japanese | 1244A5EADF673E4BD36E9967A2008F65CA2A1D40E8E7DD4D17640A6FC1EACA9A |
Korean | 6E0E057A853F54AB87F3F8984954F590FCCD3BE2EC2139F02EFA085FEA6D3E61 |
Portuguese (Brazil) | 24122C092464B299F41A7644814F375F0CC2786877BCAE0282221FF8D73BD100 |
Russian | 2CDE208C241C3F13D2EC37294C10503C7A9D1222ED33F6FE54849169F30BE697 |
Spanish | BD12844E6F0A0ECFD5815D01EDFB8018CE9B4A1044DE8DF96AC740D85E800FD6 |
SSDT for Visual Studio (VS) 2012
To install this version of SSDT, you must download an ISO image. The ISO file is a self-contained file that contains all of the components needed by SSDT and it can be downloaded using a restartable download manager, useful for situations with limited, or less reliable network bandwidth. Once downloaded, the ISO can be mounted as a drive.
Steps to install:
- Download SSDT for Visual Studio 2012 (11.1.50727.1)
- Open the ISO image.
- Run the SSDTSetup.exe file.
This SSDT for Visual Studio 2012 release can be installed in the following languages:
Language | SHA256 Hash |
Chinese (Simplified) | 78F20325648CFF49D9C58A26186E0AC199D104B3CF634E5663B4B262BEC69C07 |
Chinese (Traditional) | A2722380AF2EE1E8BB52B4FA54A61BAB411E5E5FD5B050108F81ED23DC87366D |
English (United States) | 748EF78D3F9CC6FE360432C378EA690DE51AEB2C747E87D43E08448D26F93A91 |
French | 40E6504169BF618EDC7EB5B62D1215DC96726D6EEC3CA8EC3EEB49044E4B6FB7 |
German | C45C974E6B8F9611BA2AC1EE90C5C507992BCE5693BF46F6C7C138591ED6A123 |
Italian | C1B20CDB41C7B1B5DE76A71F9A091A6FDF5186B12F6AA269DA6338B3CB2D91A6 |
Japanese | BF56958B904C1C5F28084BD0B16928B6CBFEC83EB3F0C913EC364FA335241943 |
Korean | 9023B0656785C357A67E39EB76A2806B923C2BD17342D7226A8ADA384A9F4E28 |
Portuguese (Brazil) | ACAD9FE03729E289ECE821D92C56CFB1D7FCCEA8423ABF1E164BF3C67ABEFEFB |
Russian | E2191D787BA833DF4A85B064C5373DC44099E76214FBF9505728702D4D6B83F0 |
Spanish | 6D81FB572A7003C54C29D2ACF076D2CED4A1CA80F329BFF9D41A806920D64EEE |
Note
SSDT supports the two most recent versions of Visual Studio. With the release of Visual Studio 2019, SSDT versions for Visual Studio 2015 and earlier are no longer updated. SSDT for Visual Studio 2010 is no longer available. For more information, see the FAQ section of this SSDT team blog post.
SQL BI: Analysis Services, Reporting Services, Integration services
BI templates are used to create SSAS models, SSRS reports, and SSIS packages. BI Designers are tied to specific releases of SQL Server. To use the newer BI features, install a newer versioned BI designer.
BI Designers
Download SSDT-BI for Visual Studio 2013 (SQL Server 2014, SQL Server 2012, SQL Server 2008, and 2008 R2)
Download SSDT-BI for Visual Studio 2012 (SQL Server 2014, SQL Server 2012, SQL Server 2008, and 2008 R2
Business Intelligence Development Studio (BIDS) is installed via SQL Server Setup. There's no web download (SQL Server 2008, and 2008 R2).
For SQL Server 2012 or 2014, you can use either SSDT-BI for Visual Studio 2012 or SSDT-BI for Visual Studio 2013. The only difference between the two is the Visual Studio version.
Next steps
Recommended content
- Learn about SQL Server Data Tools (SSDT). See how to install this database development tool set with Visual Studio 2019 and Visual Studio 2017.
- Learn how to install Microsoft SQL Server Integration Services (SSIS) and how to get other downloads for SSIS.
- View the release notes for all versions of SQL Server Data Tools (SSDT) that work with Visual Studio 2017 and earlier Visual Studio versions.
- Microsoft Connector for Oracle
In this article
.