Learn the powerful enterprise adaptable database:

Getting Started With ADABAS & Natural

Friday, June 24, 2022

Install SQL Server Integration Services in Visual Studio 2019

 .

Install SQL Server Integration Services in Visual Studio 2019

By: Sergey Gigoyan 

Problem

SQL Server Integration Services is Microsoft’s powerful platform for implementing Extract, Transform and Load (ETL) solutions. It allows SQL Server Professionals to solve complex business intelligence tasks and work with a wide range of data sources. Microsoft provides a graphical tool for designing and developing Integration Services projects. This tool has always been an integral part of the Visual Studio. However, the name of this tool as well as the method of its installation varies from version to version of Visual Studio (VS). In this article, we are going to illustrate how to install the SQL Server Integration Services development tool for the latest version of Visual Studio.

Solution

As mentioned above, Microsoft’s tool for developing Integration Services projects is named differently in different versions of the Visual Studio. For example, for the SQL Server 2008/2008R2 integration services, this tool was VS 2008’s Business Intelligence Development Studio (BIDS) and came with the SQL Server installation media. In VS 2010, the tool was renamed as the SQL Server Data Tools (SSDT) and shipped as a part of the SQL Server 2012 installation media. In VS 2012/2013, this tool was slightly renamed as SSDT-BI and needed a separate download. In VS 2015, it was called SSDT and needed a separate download. In VS 2017, this tool could be installed during the VS installation. It is worth mentioning that BIDS, SSDT-BI, and SSDT can be used not only for working with SSIS projects, but also SQL Server Analytical Services and SQL Server Reporting Services projects. Additionally, it is important to note that SSDT is backward compatible, which means that projects designed on the newer versions of SSDT can run on older versions of SQL Server.

Now, after that historical review, let’s move to the latest release of Visual Studio – VS 2019 and see what this version provides as an SSIS development tool. For this version of the VS, there is no standalone installer for SSDT. While in this version the core components of SSDT for creating database projects have remained integrated in Visual Studio, the Integration Services, Analysis Services, and Reporting Services projects have become just an extension of the VS. Thus, in order to install the tool for SSIS development, we first need to install VS 2019. Therefore, we will divide our article into two parts. In the first part we will describe the installation of VS 2019 and in the second part, will illustrate the SSIS’s extension installation.

Installing Visual Studio 2019

To download Visual Studio 2019 we will use the following link.

For our example, we will download the free, Community edition of this product:
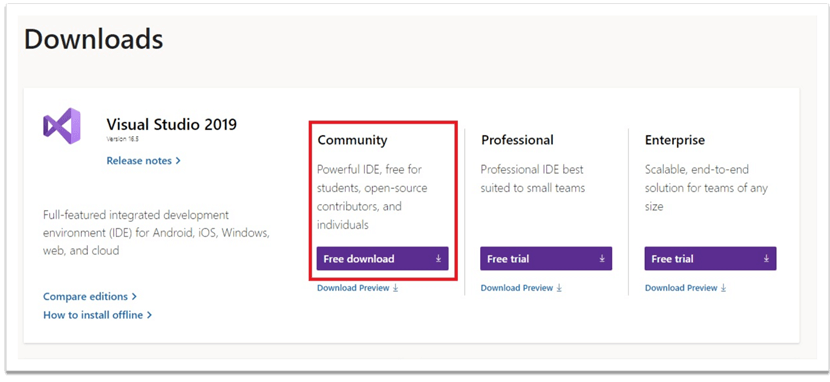
Select Community Edition of Visual Studio 2019

Then, we will click on "Free download". After downloading the .exe file, we will double click on it to start the process:

Visual Studio 2019 Executeable File

The Visual Studio installer starts and after some time the following window is opened:
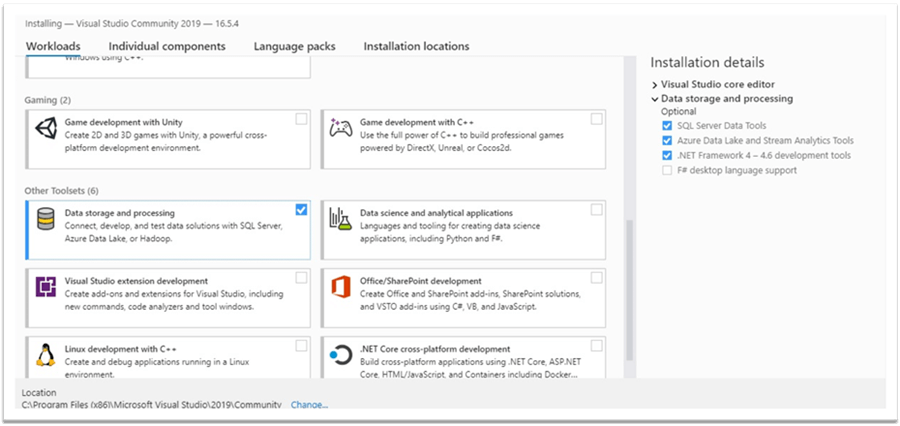
Visual Studio 2019 Installer

To add SSDT, we scroll down and choose "Data storage and processing". Then, we press the "Install" button and wait for the installation to complete:
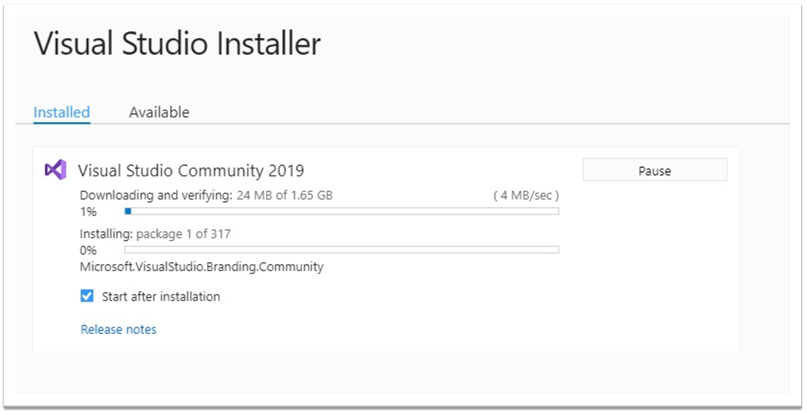
Visual Studio Community 2019 Installer Progress

After installation, restart is required, so we press "Restart":
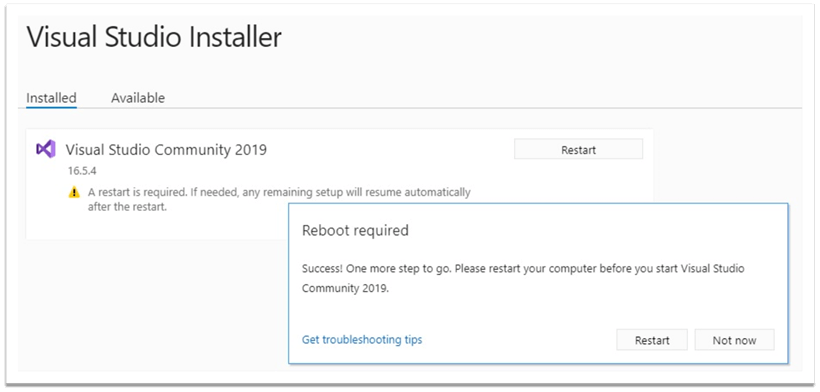
Visual Studio Community 2019 Reboot Required

After having our computer rebooted, we start Visual Studio:
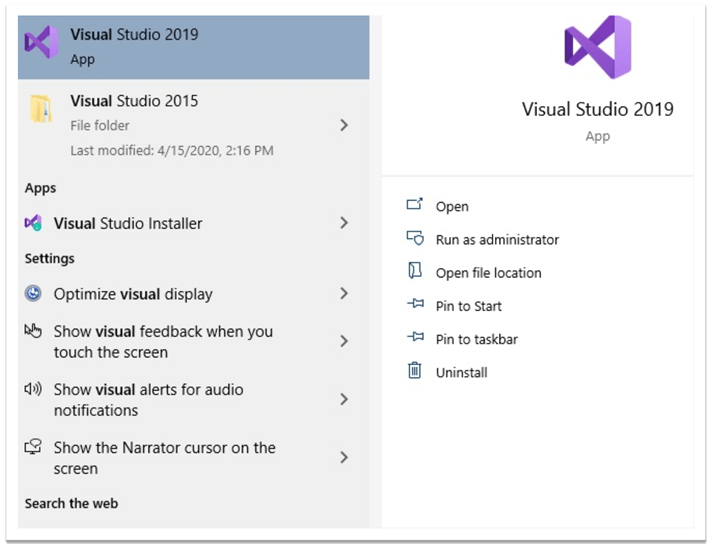
Start Visual Studio Community 2019 Edition

On the next screen, just to keep our example simple, we just click "Not now, maybe later." instead of signing in:
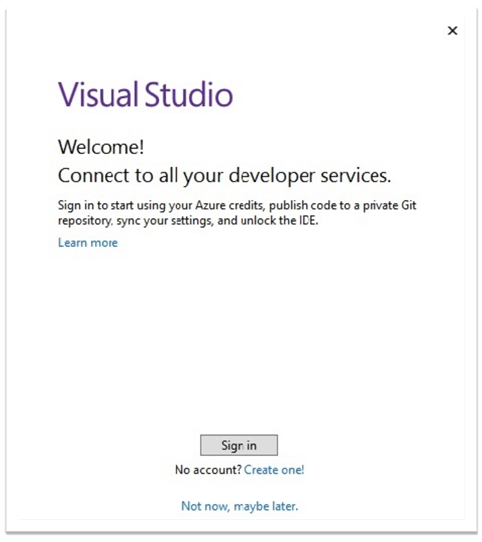
Connect all developer services in Visual Studio Community 2019 Edition

After that, we choose the theme and click on "Start Visual Studio":
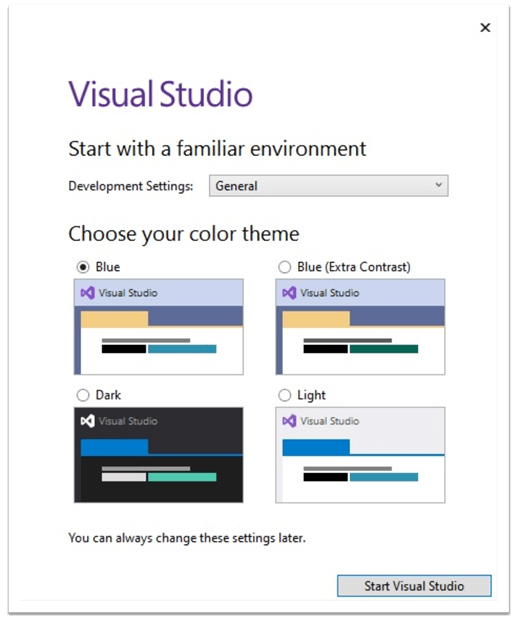
Visual Studio Community 2019 Edition Development Settings

Well, we have installed Microsoft Visual Studio 2019 on our computer. Now, it’s time to add the extension for developing Integration Services projects.

Adding the SSIS Projects extension to the Visual Studio 2019

When Visual Studio is opened, we click on "Continue without code" to add the necessary extension:

Add Extensions in Visual Studio Community 2019 Edition

In this window, we click on "Extensions" > "Manage Extensions":
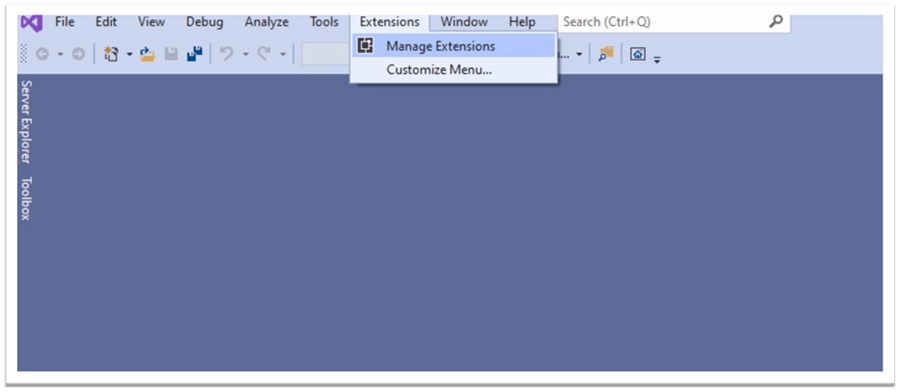
Manage Extensions in Visual Studio Community 2019 Edition

In the search bar of the opened window, we type "Integration Services" to easily locate the extension. From the appeared list we choose "SQL Server Integration Services Projects" and press "Download":
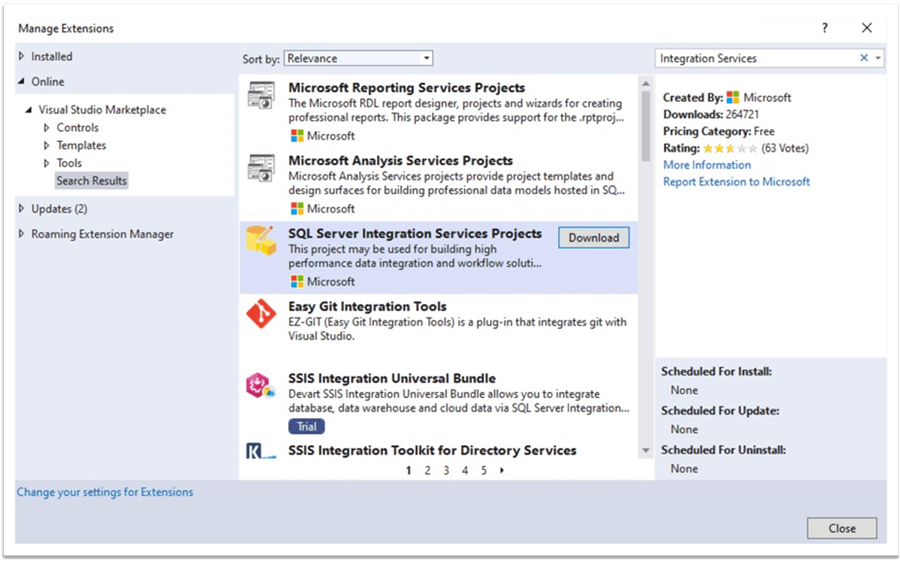
Find SQL Server Integration Services Projects in Visual Studio Community 2019 Edition

Then, we will execute the downloaded .exe file:
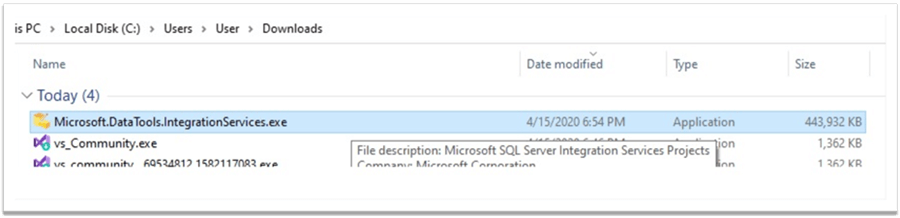
Execute SQL Server Integration Services Executeable File for Visual Studio Community 2019 Edition

The installation of the extension begins. Now, we will follow some simple steps. In the next window we click "OK":
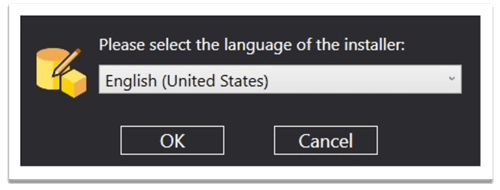
Select Language for SQL Server Integration Services Projects in Visual Studio Community 2019 Edition

After that, we click "Next" to continue:
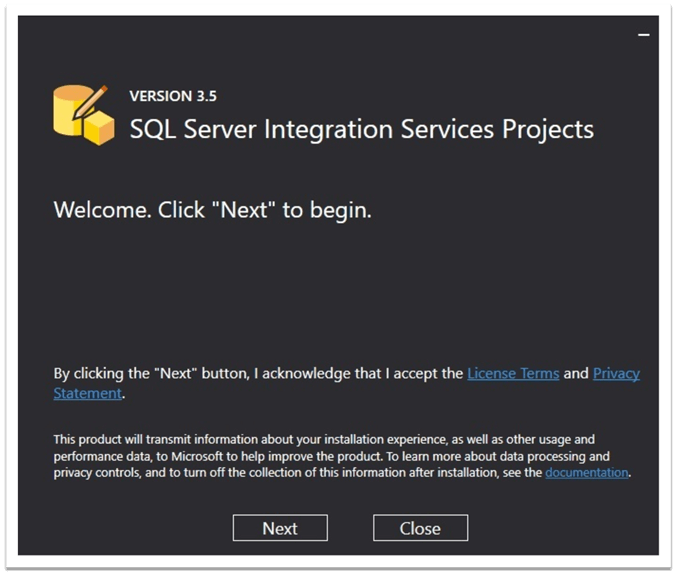
Start Installation of SQL Server Integration Services Projects in Visual Studio Community 2019 Edition

If you receive the following message, you probably have SQL Server Management Studio opened:
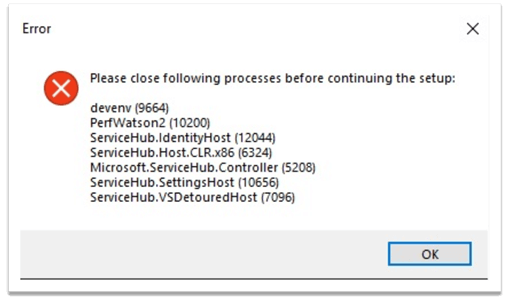
Installation Error for SQL Server Integration Services Installation in Visual Studio Community 2019 Edition

Close it and click "OK". The process should continue:
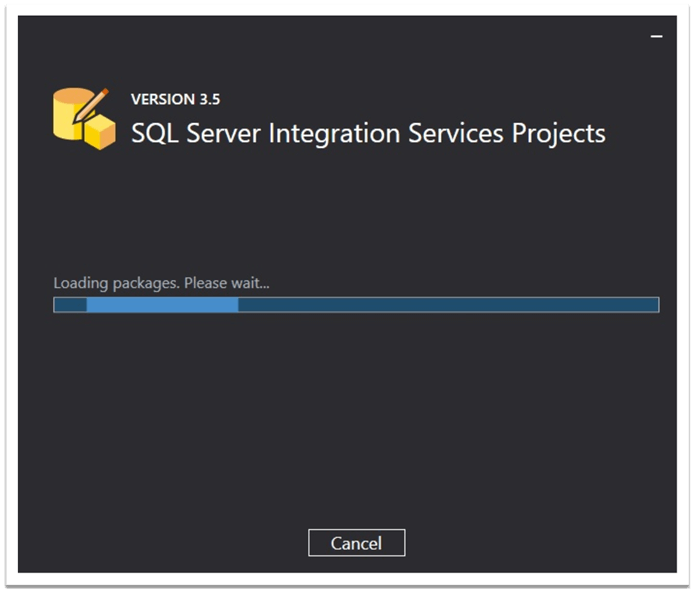
Loading Packages for SQL Server Integration Services Projects in Visual Studio Community 2019 Edition

Finally, the setup is completed and we have our extension installed:
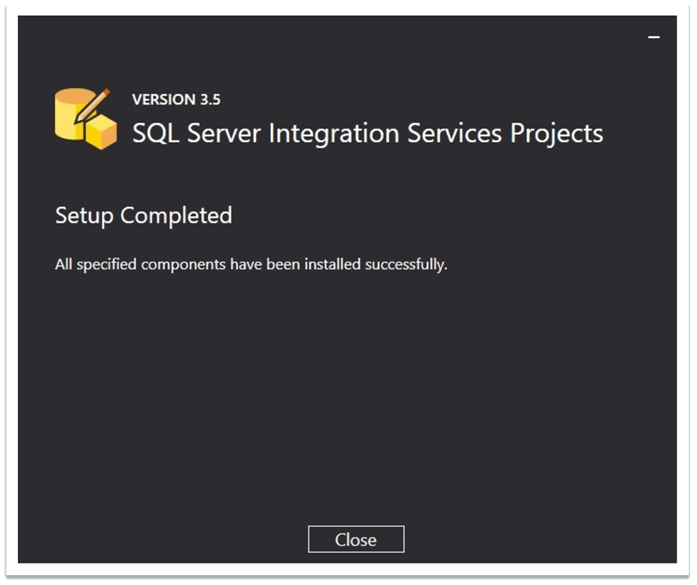
Setup Complete for SQL Server Integration Services Projects in Visual Studio Community 2019 Edition

Now, we are ready to create Integration Services projects. In Visual Studio, we choose "Create a new project":

Create New Project in Visual Studio Community 2019 Edition

In the next window, we type "integration" to find "Integration Services Project" and click on it:
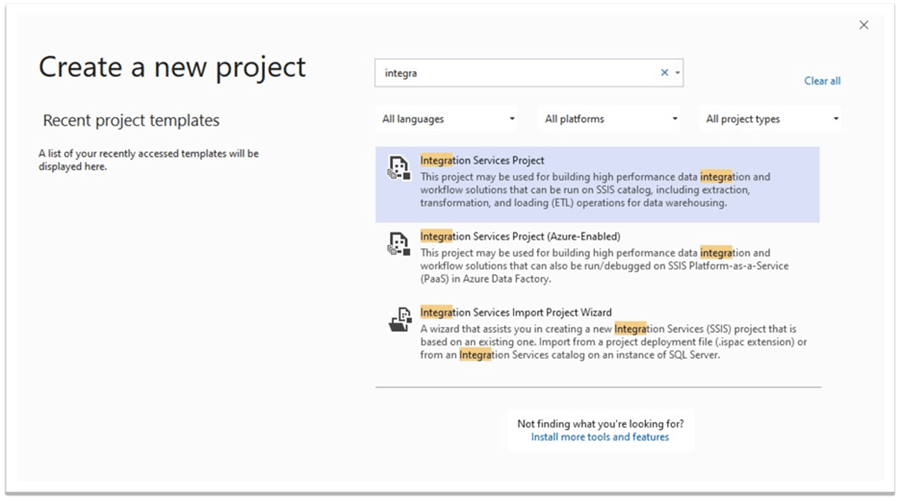
Create New SQL Server Integration Services Projects in Visual Studio Community 2019 Edition

We choose a name for our project:

Configure SQL Server Integration Services Projects in Visual Studio Community 2019 Edition

Hence, it is ready! We opened the interface where we can design and develop SSIS 2019 packages:
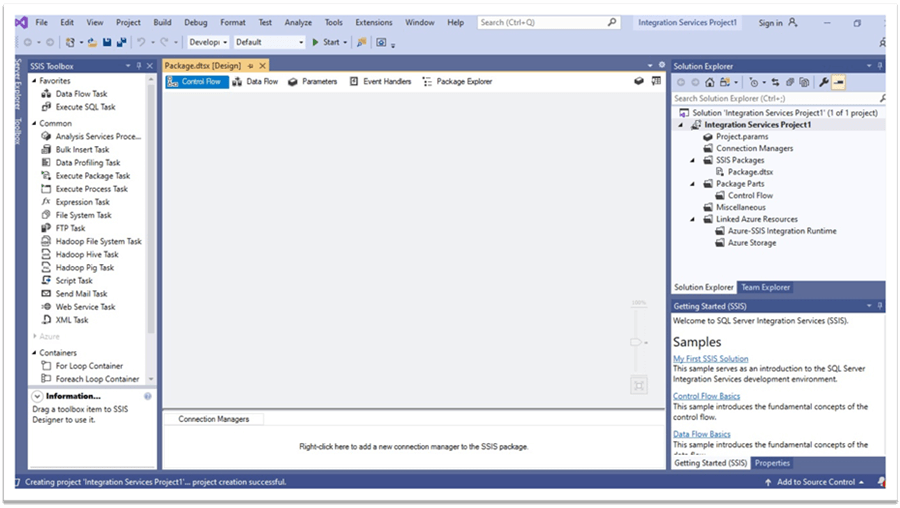
Start Building SQL Server Integration Services Projects in Visual Studio Community 2019 Edition

Conclusion

To sum up, we reviewed the updates related to the tool for SQL Server Integration Services projects development in the VS 2019. As we have seen, in this version of the VS, the tool for designing SSIS projects is installed as an extension of the Visual Studio. We have also explored how to install Visual Studio 2019 and how to add the Integration Services Projects extension to it.


.

SOURCE:

https://www.mssqltips.com/sqlservertip/6481/install-sql-server-integration-services-in-visual-studio-2019/

.

Tuesday, June 7, 2022

How to Install Microsoft SQL Server 2019 and SQL Server Management Studio

 .

How to Install Microsoft SQL Server 2019 and SQL Server Management Studio

Do you want to install SQL Server 2019 on your Windows PC? How about the latest version of SQL Server Management Studio? I’ll walk you through the process. Soon you’ll be writing T-SQL queries and operating on SQL Server databases!

As I write this article, Microsoft SQL Server 2019 is the latest version of SQL Server. It’s the 15th version of one of the most popular database servers in the world. If you need to install the previous version, see our guide Microsoft SQL Server 2017 Installation Step by Step.

There are a few ways to install SQL Server 2019; the differences depend on if you have installed the older version. In this article, I will present everything based on SQL Server 2019’s Express edition, which is free for personal and commercial use.

Even if you’re just starting to learn SQL, it’s a good idea to install this popular DBMS. If you are wondering why MS SQL Server is a good choice, read the article Microsoft SQL Server Pros and Cons, which will help answer your question.

There are a lot of good online resources for learning MS SQL Server. In my opinion, however, it is worth choosing the most effective courses right at the start. Our SQL from A to Z in MS SQL Server track will give you all the necessary skills to work freely with T-SQL (the SQL dialect used by SQL Server). If you are a complete beginner and just want to see if SQL is for you, start with our SQL Basics in MS SQL Server course.

If you like learning SQL using hands-on exercises, then you’ve got to try LearnSQL.com.

How to Install Microsoft SQL Server 2019

To install SQL Server 2019, you must first download the program from Microsoft.

You’ll see something like the screenshot below. Look for the Express version.

Install Microsoft SQL Server 2019 and SQL Server Management Studio

Found it? Click Download now, wait a moment, and then run the installation file SQL2019-SSEI-Expr.exe. The installation wizard will appear:

Install Microsoft SQL Server 2019 and SQL Server Management Studio

Select Custom if you want to choose which components to install; a lot of people use this option. As you see below, you’ll need to specify the target location for the media download. If you want to change the default path, click the Browse button. Make sure you have enough disk space.

Install Microsoft SQL Server 2019 and SQL Server Management Studio

Click the Install button to download SQL Server 2019 Express’ installation packages:

Install Microsoft SQL Server 2019 and SQL Server Management Studio

Once the download is complete, you’ll get a message that everything was successful and that the installation is about to start.

Install Microsoft SQL Server 2019 and SQL Server Management Studio

Soon, you’ll see the Installation Center window. Choose New SQL Server stand-alone installation.

Install Microsoft SQL Server 2019 and SQL Server Management Studio

You must accept the license terms to use this producy, so check the button I accept the license and click the Next.

Install Microsoft SQL Server 2019 and SQL Server Management Studio

The installation process will start by identifying any problems and seeing if there are any existing files to update:

Install Microsoft SQL Server 2019 and SQL Server Management Studio Install Microsoft SQL Server 2019 and SQL Server Management Studio

If you only see warnings about the Windows firewall, you’re good to go. Click the Next button.

Install Microsoft SQL Server 2019 and SQL Server Management Studio

Now you can configure the server instance. I’ll leave it with the default settings.

Install Microsoft SQL Server 2019 and SQL Server Management Studio

Next, the setup wizard will install Java. It’s required for SQL Server to run:

Install Microsoft SQL Server 2019 and SQL Server Management Studio

When that’s done, the server configuration will appear. Click the Next button if everything looks good:

Install Microsoft SQL Server 2019 and SQL Server Management Studio

In Database Engine Configuration, you can change the authentication mode to Mixed. This will allow you to log into the server using either Windows authentication or a SQL Server sa (standard account) and a password which you choose:

Install Microsoft SQL Server 2019 and SQL Server Management Studio

Accept, download, and install R and Python. They can be useful in MS SQL Server:

Install Microsoft SQL Server 2019 and SQL Server Management Studio Install Microsoft SQL Server 2019 and SQL Server Management Studio

The installation will start.

Install Microsoft SQL Server 2019 and SQL Server Management Studio

When the installation process is complete, click Close.

Install Microsoft SQL Server 2019 and SQL Server Management Studio

Congratulations! You’ve just installed SQL Server 2019 on your computer. You can start writing your first queries using the IDE of your choice, an appropriate text editor, or the command line. If you want to use PostgreSQL too, no problem. Learn how to install PostgreSQL on Windows 10 in 5 minutes.

How to Install Microsoft SQL Server Management Studio

To work even more effectively with MS SQL Server, I recommend that you use Microsoft SQL Server Management Studio (SSMS) or a similar tool. SSMS is used by many professionals around the world, and it’s available for free.

I already showed you how to install the database; now I will guide you through installing this great editor.

To do this, you must go back to the SQL Server Installation Center. This is where you chose the new stand-alone database installation.

Install Microsoft SQL Server 2019 and SQL Server Management Studio

Now  choose  Install SQL Server Management Tools. You will be taken to Microsoft's website, where you’ll find and download the latest version of Management Studio.

Install Microsoft SQL Server 2019 and SQL Server Management Studio

Run the downloaded SSMS-Setup-ENU.exe file and the installation process will begin. Click the Install button to start. (You can change the installation path by choosing another folder.)

Install Microsoft SQL Server 2019 and SQL Server Management Studio

The packages will be loaded.

Install Microsoft SQL Server 2019 and SQL Server Management Studio

In the last step, you will be asked to restart your computer.

Install Microsoft SQL Server 2019 and SQL Server Management Studio

Go ahead and restart your PC. In the Start menu (assuming you’re using Windows OS), you’ll see Microsoft SQL Server 2019, which contains Microsoft SQL Server Management Studio. Click on it to start using this application.

Install Microsoft SQL Server 2019 and SQL Server Management Studio

Now you will have to connect to SQL Server. Choose SQL Server Authentication from the  Authentication drop-down menu and make sure the server type and name options are correct:

Install Microsoft SQL Server 2019 and SQL Server Management Studio

Write sa in the Login field and the server password that you used when installing the database. You can check Remember password if you don’t want to keep repeating this step each time you log in. Click Connect.

Install Microsoft SQL Server 2019 and SQL Server Management Studio

The editor is ready to manage the server and databases:

Install Microsoft SQL Server 2019 and SQL Server Management Studio

Now you are ready to write your first SQL scripts. This software is available for seven different database servers, including SQL Server and Oracle.

Have fun with MS SQL Server 2019 and MS Management Studio!

Other Popular Tools That Connect to SQL Server 2019

There are other tools which allow you to manage SQL Server 2019. They are all great alternatives to SSMS. The choice of a particular tool depends on your preferences. I recommend that you test a few of them and see which works best for you:

  • SQLGate – A powerful database IDE, SQLGate is available in different languages and for different database systems like SQL Server, Oracle, PostgreSQL, etc. You can purchase a license, pay for a subscription, or use a free version.
  • HeidiSQL – This is another tool for managing popular databases like SQL Server, PostgreSQL, MySQL, SQLite, etc. It is free and easy to learn.
  • RazorSQL – This is a simple SQL query editor and database browser with administration tools available for different OSs. It is paid and licensed per user.
  • Squirrel SQL – A free, Java-based GUI application, this SQL tool works on different OSs and for various popular database servers. Plus, it has a lot of cool plugins.

There are more tools that can help you to work with MS SQL Server database. Find one you like and start your database adventure.

How to Upgrade to SQL Server 2019 From an Earlier Version

Installing an entire new version of SQL Server is not necessary if you have an older version of SQL Server on your computer. For example, if you have installed SQL Server 2017 and want to update it to 2019, you can do that. First, launch SQL Server Installation Center:

Install Microsoft SQL Server 2019 and SQL Server Management Studio

Next, click Upgrade from a previous version of SQL Server. In the Browse For Folder window, select your SQL Server media folder (the actual name may vary) and click OK.

Install Microsoft SQL Server 2019 and SQL Server Management Studio

The upgrade process will start. It’s very similar to the installation process we used earlier. Just follow the steps and you’ll have the new version of SQL Server installed.

Install Microsoft SQL Server 2019 and SQL Server Management Studio

.